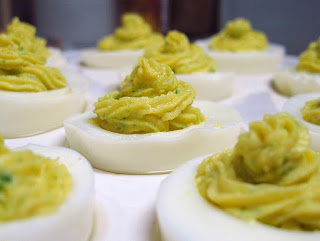
Showing posts with label chef tips recipe. Show all posts

Friday, November 2, 2012

National Deviled Eggs Day Nov. 2!


Deviled Eggs

Also known as stuffed eggs, starts with hard-boiled eggs, peeled, cut in half and stuffed with a seasoned, mashed yolk mixture. The yolks are removed from the whites, mixed with a moistener, such as mayonnaise, flavoring foods and/or seasonings and then piled back into the whites.

 The word “devil” originally referred to the combination of spices, including dry mustard and vinegar with which the eggs were highly seasoned.

Deviled Eggs are easy to make and allows creativity to flow in regards to the variety of combinations one can come up with. Check out the recipes below or create your own:


<Sriracha Deviled Eggs

Lobster Deviled Eggs
Bacon and Cheddar Deviled Eggs Recipe
Smoked Salmon Deviled Eggs


Wasabi Deviled Eggs


Seafood Deviled Eggs   >


What is your favorite Deviled Egg Recipe?
FYI!
Hard-boiled eggs will easily reach internal temperatures of more than 160°F (71°C) when they are done. Note, though, that while Salmonella are destroyed when hard-boiled eggs are properly prepared, hard-boiled eggs can spoil more quickly than raw eggs.

To make Hard boiled eggs, place eggs in a saucepan large enough to hold them in a single layer. Add enough cold water to come at least 1 inch above the eggs. Heat over high heat to boiling. Turn off heat. If necessary, remove the pan from the burner to prevent further boiling. Cover pan. Let the eggs stand in the hot water about 12 minutes for large eggs (about 9 minutes for medium, about 15 for extra-large).

After cooking, cool the hard-boiled eggs quickly under running cold water or in ice water. Avoid allowing eggs to stand in stagnant water. Refrigerate hard-boiled eggs in their shells promptly after cooling and use them with one week.

To peel an egg, crackle the shell all over by gently tapping the egg on a table or countertop. Roll the egg between your hands to loosen the shell. Then peel off the shell, starting at the large end. Hold the egg under running water or dip it in water to make peeling easier.

A nicely centered yolk makes very attractive deviled eggs and garnishes. However, as an egg ages, the white thins out which gives the yolk more opportunity to move about freely. This can result in a displaced yolk when you cook the egg. Using the freshest eggs possible will minimize this displacement, but very fresh eggs are more difficult to peel after hard boiling.
The best compromise for attractive eggs with centered yolks that are relatively easy to peel seems to be using eggs that have been refrigerated for about a week to 10 days. Some new research suggests that yolk centering may be better if you store eggs small-end up for 24 hours before hard-boiling.


Resource:
Incredibleegg.org
America Egg Board

Tuesday, September 11, 2012

Enjoy the taste, look and benefits of Bell Peppers!


Not only are bell peppers delicious to eat and beautiful to look at, but they are also packed with nutritional benefits. All bell peppers are high in vitamin C with the red pepper having more than twice as much as the green pepper. The bell pepper is also a wonderful source of vitamin A, vitamin B, antioxidants and carotenoids.
The bell pepper, also known as sweet pepper or capsicum, is of the species Capsicum annuum and native to Mexico, Central America and northern South America. Bell peppers are botanically fruits, but in culinary contexts they are usually considered to be vegetables.

Bell peppers can be bought year-round, but they are most abundant and tasty during the months of August and September. Colors range from the burgeoning colors of green to yellow, and ripen to the sweeter-tasting colors of red, orange, and sometimes purple and brown, depending on the variety.
Picking a good pepper is easy: they should have a smooth and tight skin (no wrinkles, or soft or bruised spots), plus bright color, and feel firm and solid. A look at the stem is another place to peek: it should appear fresh, green, and not dry or desiccated.
Don’t wash a pepper until use: ideally store unwashed peppers in a cool place covered with a kitchen towel, or second best is in the vegetable compartment in your refrigerator (but not in plastic, which will create excess moisture). Some even freeze them, either whole, or cleaned, deseeded, and chopped

Peppers can be eaten raw or cooked. If eating it raw, wash it first, then core it (cut around the stem with a paring knife). Cut the pepper in half lengthwise and then remove any seeds and the white core/ribs—you can try shaking the seeds into the garbage. Don’t be tempted to use water to remove the seeds: it will just waterlog it. The pepper is then ready to be cut into strips, chopped, or diced. For those want to stuff a pepper, cut it horizontally instead of cutting it lengthwise then remove the seeds and core. One precaution: even though peppers are typically sweet, be sure to wash your hands well when all is said and done—don’t touch your eyes!

Peppers are also delicious roasted. They can be grilled with tongs over a gas burner until blistered and the skin starts to blacken, or in the broiler: simply put cut pepper halves on a cookie sheet and roast. The best way to peel the skin is to then place the peppers in a bowl covered with plastic wrap, or in a paper bag. Steam for about 15 minutes, and then peel the skin off with your fingers (or a knife if they’re too hot).
Peppers can also be stuffed, or sautéed—peppers are a delicious addition to a stir-fry. Peppers also pair well with meat, like a classic Italian sausage and peppers dish, or with steak. Some like to puree peppers into dips, like hummus, or into soups

Here are a few recipes to try from Sauver.com:
  
Poor Man's Caviar
Black-eyed peas, scallions, and both red and green peppers combine in a salad that's equally delicious spread on bread or spooned from bowl.

Baked Chicken with Peppers
This vibrant baked chicken and peppers dish is as simple as it is classic.

Peppers in Tomato Sauce
Serve these preserved peppers over pasta or chicken for a bright meal.

Pesto Calabrese
This Southern Italian pesto gets its hue from tomatoes and red bell peppers.

Green Pepper Butter
Minced roasted green pepper adds irresistible flavor to this savory compound butter.

Muhammara (Roasted Red Pepper, Walnut and Pomegranate Molasses Dip)
This Middle Eastern dip is one part sweet, one part tangy, and one part spicy; it's the perfect combination for slathering on sandwiches or serving with homemade pita chips.

Sweet Pepper Salad
Roasted red and green peppers get a kick from sugar and vinegar -- great served with grilled meats.

Eggplant Stuffed Peppers
Bell peppers are blistered over a flame before being stuffed with eggplant, breadcrumbs, and anchovies.


photo credit: wallyg via photo pin cc

Monday, July 30, 2012

Meatless Monday

Chayote
Chayote is member of the squash family that originated in Mexico but can now be found throughout the world. 

Chayote may be called a vegetable pear, chcocho, or christophene. It's flavor is described as a cross between a turnip, cucumber and zucchini.

Chayote Squash is very low in Saturated Fat, Cholesterol and Sodium. It's also a good source of Niacin, Vitamin B6, Pantothenic Acid, Magnesium and Potassium, and an excellent source of Dietary Fiber, Vitamin C, Vitamin K, Folate, Zinc, Copper and Manganese.

Selection: Good-quality chayote will be firm, unblemished and light to medium-green in color. The skin may be either smooth or rough.

Usage: Use like a squash - steam, bake, stuff or fry.

 Today's Meatless Recipe
Stuffed Chayote Squash
Serves 4
Ingredients
•    4 medium chayote squash
•    1 cup chopped onion
•    2 Tbsp. Grapeseed oil
•    2 cloves garlic, minced or pressed
•    1/4 cup chopped fresh parsley, optional
•    8 ounces Soy Sausage
•    1 tsp. dried rosemary, crushed
•    3 slices whole wheat or French bread, cubed
•    1/4 cup almond milk plain
•    1/4 cup grated parmesan cheese
•    1/4 cup Italian salad dressing

Directions
1.    Preheat oven to 350.F
2.    Cut squash in half, lengthwise. Steam until just tender.
3.    Sauté onion in the oil. Add garlic and parsley after onion is soft and transparent. Stir in soy sausage, breaking it up. Add rosemary. Cook for 15 min., pouring off excess grease.
4.    Moisten bread with the milk. Squeeze out liquid. Add bread and cheese to meat mixture.
5.    Scoop out squash, leaving a shell. Chop pulp coarsely. Add to mixture. Stuff squash shells, piling filling high. Place in lightly oiled baking dish.
6.    Bake for 20 min. until heated thoroughly. Drizzle with a little salad dressing and serve hot.

More Recipes:
Crispy Onion Chayote Bites  
Roasted Sweet Potato and Chayote Salad

Resources:
Produce Oasis
Fruit & Vegetables More Matters

Thursday, July 5, 2012

Is grilling a healthy alternative?

This time of year there is something absolutely yummy about food fresh off the grill – the aroma – the taste.  It makes my mouth water.  Whether your preference is grilled meats, grilled veggies, or grilled fruit, food just tastes better when it’s prepared on the grill.  Plus, who wants to be stuck inside cooking while everyone else is outside enjoying the summer? 

But is grilling as healthy - or healthier - than other cooking methods? 

Image: FreeDigitalPhotos.net
In some respects, grilling is definitely healthier.  Since you don’t need to add any oil or fats when cooking on the grill, you avoid soaking up fat into the foods.  Plus fat drips off grilled meat, rather than going back into it.  Also, valuable nutrients are retained in grilled food that would be lost in the water if boiled.   Finally, grilling adds flavor to food without adding fat or salt or any unhealthy additives.

However, there is one thing you do need to be aware of – research has shown that cooking meats at very high temperatures can cause a higher risk for cancer. According to an article by Rebecca Viksnins Snowden on the American Cancer Society’s website, “…cooking meats at very high temperatures creates chemicals (heterocyclic amines, or HAs) that might increase cancer risk. Heterocyclic amines (HAs) are created by the burning of amino acids and other substances in meats cooked at particularly high temperatures and that are particularly well-done.”  Snowden continues, “HAs turn up in grilled and barbecued meat as well as broiled and pan-fried meat.”

So if you want to take advantage of the health benefits and avoid the potential health risk of grilling, you can either grill your food at a lower temperature or grill just fruits and vegetables, which don’t create the harmful chemicals meat does.  If you can’t resist a grilled steak, here are some tips from Snowden to keep it healthier:

·         Choose lean cuts of meat and trim any excess fat. Fat dripping onto hot coals causes smoke that contains potential carcinogens. Less fat means less smoke.

·         Line the grill with foil and poke small holes in it so the fat can still drip off, but the amount of smoke coming back onto the meat is lower.

·         Avoid charring meat or eating parts that are especially burned and black – they have the highest concentrations of HAs.

Grilling, like any cooking method, is only as healthy as the food you begin with, so choose wisely.  And if you add unhealthy marinades or condiments, you counter-act the benefits of grilling.  With a little thought, you and your family can enjoy healthy and tasty meals fresh off the grill.   

A Recipe for the Grill

Lemon, Rosemary & Balsamic Chicken Thighs
Yield 2- 4 servings

8 chicken thighs
1 Tbsp Wildtree Lemon  Rosemary Blend or Lemon Pepper
¼ cup Wildtree Roasted Garlic Grapeseed oil
½ tsp Wildtree RancherSteak Rub
2 Tbsp lemon zest
½ Tbsp crushed red pepper flakes (optional)
2 Tbsp balsamic vinegar

Remove excessive fat from chicken and wash with salt water then drain.
Combine all ingredients in plastic bag and marinate for 1 – 2 hours. 


Grilling Instructions
Preheat grill to medium.   Cook chicken on the skin side for 10 to 12 minutes and then turn over and cook for the same amount of time - cooked through (internal temp at 160 degrees). If there are flare-ups, move the chicken out of the way so there is no sooty film on the chicken.  Baste any leftover lemon balsamic mix once the chicken has turned over.   The chicken is done when the juices run clear when the pricked at the thickest part of the thigh.
 
Wildtree products are All natural, preservative free, no dyes and low in sodium and sugar.


Monday, June 4, 2012

Meatless Monday

'Kale Chips' photo (c) 2012, Lori L. Stalteri - license: http://creativecommons.org/licenses/by/2.0/ Add more Kale to your diet
Kale has a good source of calcium, magnesium, vitamin A, vitamin C, fiber, iron, folic acid, amino acids, antioxidant flavonoids, and lutein.


Kale is available year round. The best crop is in the winter because cold weather makes it sweeter.  It is easy to grow and make a perfect crop for a container garden. There are several varieties of kale: the most common is green (curly-leaf) kale, dinosaur kale and red Russian. The smoother leafed varieties are milder in taste. Kale

is easy to prepare, versatile, and delicious.


Kale should be stored in the refrigerator crisper up to a week, and it gets stronger in taste as it is stored.  To store longer, wash, remove tough stems, dry, mince or chop and freeze. It thaws quickly and can be used like raw kale.
Eat kale raw, in a salad, use it as a wrap, or juice it or add it to a smoothie. Kale can be blanched, boiled, braised, sautéed, steamed or stir-fried. People prepare it in a similar manner to Swiss chard or collards: season with onions, garlic, tamari ginger or sesame oil, to name a few.  

 
Stir Kale into bean dishes, eggs, sautéed with pasta, add to lasagna or potato dishes, tuna, vegetable salads or soups, stews and sauces. You can also make roast kale and make flavorful snacks; Sprinkle crumbled kale chips on pizza; the list is endless.


Some comparisons between beef and kale:
Organicauthority.com's Jill Ettinger had these reasons to try kale:


1. Sustainability. Kale grows to maturity in 2 months. Meat cattle mature between 18 - 24 months of age. One pound of beef takes 2400 gallons of water and 16 pounds of grain.
2. Anti-inflammatory. The consumption of animal proteins is a major cause of autoimmune disease, heart disease and arthritis. The nutrients in kale make it anti-inflammatory. It is so nutrient-dense is can actually reverse some of these conditions.
3. Iron. Per calorie, kale has more iron than beef.
4. Fiber. Needed daily, few Americans get enough. Ongoing fiber deficiency is linked to many diseases, including digestive disorders, cancers, and heart disease. Most Americans get their protein from animal sources, which provide no fiber. Kale provides about 5% of the RDI per serving, along with two grams of protein.
For more comparisons for choosing Kale over beef read 7 Reasons Kale is the new Beef                       

Resources:


Indian-Spiced Kale & Chickpeas
Recipe adapted from Eating Well.com
EatingWell
 Servings: 4 servings, about 3/4 cup each
 Prep Time: 15 mins  Total Time: 25 mins

 Ingredients
  • 1 tablespoon extra-virgin olive oil
  • 3 cloves garlic, minced
  • 1-1 1/2 pounds kale, ribs removed, coarsely chopped (see Tip)
  • 1 cup reduced-sodium chicken broth, or vegetable broth
  • 1 teaspoon ground coriander
  • 1/2 teaspoon ground cumin
  • 1/4 teaspoon garam masala, (see Ingredient note)
  • 1/4 teaspoon salt
  • 1 15-ounce can chickpeas, rinsed
Directions
Heat oil in a Dutch oven over medium heat. Add garlic and cook, stirring, until fragrant, about 30 seconds. Add kale and cook, tossing with two large spoons, until bright green, about 1 minute. Add broth, coriander, cumin, garam masala and salt. Cover and cook, stirring occasionally, until the kale is tender, 8 to 10 minutes. Stir in chickpeas; cover and cook until the chickpeas are heated through, 1 to 2 minutes.
 Tips:
Tip: A 1- to 1 1/2-pound bunch of kale yields 16 to 24 cups of chopped leaves. When preparing kale for these recipes, remove the tough ribs, chop or tear the kale as directed, then wash it--allowing some water to cling to the leaves. The moisture helps steam the kale during the first stages of cooking.
Ingredient Note: Garam masala, a ground spice mixture traditionally including coriander, cumin, cinnamon, peppercorns, cardamom and cloves, is commonly used in Indian cooking. Find it in the specialty-spice section of large supermarkets.
 Nutrition information
Per serving: Calories 202, Total Fat 5 g, Saturated Fat 1 g, Monounsaturated Fat 3 g, Cholesterol 1 mg, Sodium 415 mg, Carbohydrate 32 g, Fiber 6 g, Protein 9 g, Potassium 499 mg. Exchanges: Starch 1,Vegetable 1.5,Lean Meat 1,Fat 1. Percent Daily Values are based on a 2,000 calorie diet


More Kale Recipes to try:

Massaged Kale Salad
KaleSlaw with Avocados and Almonds
14 Kale Recipes from Cooking Light
Kale Chips


Monday, December 12, 2011

Meatless Monday

Portobello Pizzas

SERVES 4       Picture and Recipe adapted from Vegetarian Times
Ingredients

  • 4 giant Portobello mushroom caps (about 20 oz. total)
  • 2 Tbs. balsamic vinegar, or more as needed
  • 1 1/2 Tbs. basil pesto sauce
  • 1 1/2 cups shredded combination low-fat mozzarella and provolone cheeses
  • 2 oz. sun dried tomatoes chopped
  • 6 artichoke bottoms (6 oz.), chopped
  • 2 Tbs. (1 oz.) chopped oil-cured olives, optional
  • Pinch oregano
Directions

1.       Preheat oven to 425F. Line baking sheet with foil, and spray foil with nonstick cooking spray. Prep vegetables.


2.       Wipe mushroom caps clean, and remove stems. Using small spoon, gently scoop out black gills on underside of mushroom caps, and discard gills. Place mushrooms, cap side down, on foil-lined sheet.


3.       Combine balsamic vinegar and pesto in small mixing bowl, and brush mixture on mushroom caps. Place in oven, and cook for 5 to 7 minutes, or until tender.


4.       Meanwhile, Chop the mushroom stems finely and place in a bowl. Add to the bowl 1 cup cheese, sun dried tomatoes, artichoke bottoms, olives and oregano, tossing to mix well. Remove mushrooms from oven, and, dividing mixture evenly, fill each cap. Sprinkle remaining 1/2 cup cheese over mushrooms.

5.       Bake 7 to 10 minutes more, remove from oven and serve.
 
Large Portobello mushroom caps are the foundation for mini pizzas, packed with the same intense flavors as the standard pizza-parlor pie but minus the calories. Serve with garlic toast and a tossed green salad, and end with an fresh oranges slices with cinnamon for dessert.

Sunday, December 4, 2011

Meatless Monday

Vegetable Strudel

I love food that has a crunch. The flaky and crispy Phyllo pastry with various textures of vegetables and spices makes this a fun and exiciting vegetarian entree.

Phyllo is a paper thin sheets of unleavened flour dough. You can find it in the freezer section of most super markets. A few stores carry whole wheat phyllo like Whole Foods.
There are two packs of 8 sheets in each box and for this recipe we used one package. The dough takes about one hour to thaw at room temperature in its plastic package.

The dough can dry out quickly once it is removed from the plactic.  So have all your ingredients ready before removing it from its plackaging. 
 
Vegetable Strudel
Yields 4-6 servings

Ingredients
  • 3 Portobello caps, cleaned and cut into strips
  •  8 pieces Butternut Squash sliced into 2 inch x ¼ inch long strips
  • 1 Red onion sliced
  • 2 Japanese eggplant cut lengthwise into 4 slices each
  • 1 zucchini, cut into 2-inch long strips
  • 1 yellow squash, cut into 2-inch long strips
  • 2 teaspoons olive oil
  • Salt and freshly ground black pepper                                                
  • 2 garlic minced
  • 2 cups baby spinach
  • ¼ teaspoon thyme
  • Pinch nutmeg
  • 8 sheets Phyllo dough
  • Nonstick cooking spray ( Can use grape seed, Olive or canola oil)
  • Tomato Vodka  Sauce
Directions

Prep vegetables and preheat oven to 400 degrees F.
In a large bowl, toss all the cut vegetables with olive oil, garlic thyme and nutmeg until each piece is coated and then sprinkle with salt and freshly ground black pepper. Transfer the vegetables to a baking sheet and roast until tender about 15 minutes. Allow the vegetables to cool and then place them in a large bowl. Toss in baby spinach. Turn the oven temperature to 425 degrees F.

Lay one sheet of Phyllo lengthwise on cutting board and spray with cooking oil. Top the oil sheet with another and spray the sheet with cooking spray and then stack with another sheets so that there are 4 layers. Repeat with the remaining four sheets so that you have two sets of 4 layers of Phyllo dough.
Turn the Phyllo lengthwise vertically and place about 1/2 of vegetable mixture in the center of each stack. Roll up and tuck in the sides to make a strudel. Make several slits on top of each strudel. Spray the outsides of strudel with cooking spray, place on a parchment paper line baking sheet and bake until golden brown, about 20- 25 minutes.
Let the Vegetable Strudel rest a few minutes before slicing and serving.
Warm Tomato Vodka sauce in a saupe pot over medium flame and spoon sauce on plate then place a slice of Strudel on top and garniah with fresh basil or parsely.


Wednesday, August 24, 2011

Prepping an Avocado

The best way to prep an avocado is to cut it in half by running the blade of a knife around the seed, cutting the fruit in half from end to end. 

A gentle twist will separate the two halves, leaving the large pit in one of them. A gentle but firm whack with the blade of a knife and a gentle twist will remove the pit, leaving it firmly and seemingly permanently imbedded on the blade of the knife. The best - and safest - way to dislodge it is to approach the pit from the blunt side of the knife, prying it off with thumb and forefinger on opposite sides of the blade.

Recyle Note: The Pit of the Avocado makes a great massage tool.

Scoop the avocado flesh out of the skin with a tablespoon as whole and unblemished piece. Then placed on a cutting board and cut it into cubes or slices. Another option after scooping the avocado flesh from the skin is to mash the avocado and use it to make guacamole or avocado mayonnaise.


Avocados can be sliced with the skin on. Cut the avocado half into slices, skin and all, and then peel the skin away from the individual slices. The skin gives you something to hold onto as you maneuver the sometimes slippery slices of avocado to their final destination.

Avocados can darken quickly when mashed or sliced and exposed to the air, spoiling the look of it. A sprinkle with lemon or lime juice will ensure that the avocado does not darken for a short period of time.
  
Did you know that Avocados can help soften dry rough skin? Mix flesh of ½ Avocado, 1 teaspoon of honey, and one tablespoon of plain yogurt until creamy. Spread in on your clean skin and let sit 15 – 20 minutes. Rinse your skin with warm water, pat dry and apply a moisturizer.